 |||
|||
I started using Markdown and Pandoc last year to help me be more productive with my TTRPG-related writing. I was finding that when using Google Docs, I became too preoccupied with the formatting and layout of my text in the middle of writing it, instead of focusing on getting the content out onto the page and written down. Using Markdown frees me from that, and forces me to operate in a plaintext environment where the words are what matter. Pandoc and LaTeX have become my preferred way of publishing TTRPG supplements, mostly because…
I have done all my Markdown / Pandoc / LaTeX projects on a Lenovo C330 Chromebook. I honestly can’t speak highly enough of Chromebooks as an affordable computing platform, especially now that they offer a Linux VM built-in. I find that Chromebooks suffice perfectly well for general web browsing, email, and the like, and the Linux terminal lets me do cool command-line things (like this project). Just remember that the Linux terminal can only interact with files in the “Linux Files” directory. This makes it a bit of a pain to back up projects in the cloud, as it won’t be backed up automatically. You’ll have to periodically manually save the working copy into your Google Drive folder to back it up.
The downside of Chromebooks, espeically the lower-end ones, is that it may be hard to get your usual AAA graphical interface apps running well on them. I tried installing Krita (an open-source professional painting application) in the Linux VM of my Chromebook. It launched alright, but performance was dismal and laggy on my 4GB of RAM. This hasn’t been too terrible yet as I have a desktop Windows machine for heavy stuff, but just be aware.
Go here: https://pandoc.org/installing.html and follow the steps for your operating system.
sudo apt-get install pandoc.📝 Note: you only need ONE LaTeX distribution, MiKTeX OR TeX Live. You DO NOT need both of them.
Go here: https://miktex.org/download and follow the steps for your operating system. I have not installed MiKTeX myself, and their instructions seem much more straightforward than TeX Live, so I don’t really have anything to add to the steps shown on their webpage.
⚠️ Warning: Installing the TeX Live distribution may take several hours depending on your internet connection. It also requires the use of the command line terminal, even on Windows systems.
For your reference, here are the pertinent tug.org pages:
These instructions were very hard for me to follow as-written, so I’ve outlined the process that I used below. This should be much more readable than jumping between those three pages.
tar -xf install-tl-unx.tar.gz in the terminal (Chromebook users will have to move this archive into the Linux Files directory prior to running any terminal commands on it).WIN+R keypress to open the RUN application.cmd to run the command line terminalcd /install-tl-windows (or whatever your unpacked filepath is) to change to the archive directory.cd /install-tl-unx (I’m assuming you already have the Linux terminal open).perl install-tl-windowsperl install-tlo option at this point.i option.PATH variable is where your computer looks for commands. We need to add the TeX Live directory to PATH so that the computer recognizes the various LaTeX commands that Pandoc will be spitting out.PATH=/usr/local/texlive/2021/bin/x86_64-linux:$PATH~/.profile or ~/.bashrc (on my Chromebook, I needed to edit ~/.profile).PATH.Start by creating a new file called myfile.md . Chromebook users, remember that this needs to be in your “Linux Files” directory. Using your text editor, type the following into the file:
---
title: This is My Title
author: John Smith
date: 2022-01-01
---
This is called a YAML metadata block. Pandoc references it when generating parts of a PDF or HTML file, such as the title page of a PDF or the title of an HTML webpage.
Let’s keep typing.
# Introduction

This is my introduction. Blah blah blah.
The # symbol denotes a header. A single # is the first level header (interpreted by Pandoc as a chapter when generating a PDF), two ##s is a second-level header, etc. The Markdown Guide cheat sheet has a concise list of the most commonly used Markdown syntax.
One important note is that line breaks are created by leaving two spaces at the end of a line, then hitting return. For example:
This is line 1 with a return at the end (incorrect).
This is line 2 with two spaces, then a return at the end (correct).
This is line 3.
Will be rendered as:
This is line 1 with a return at the end (incorrect).This is line 2 with two spaces, then a return at the end (correct).
This is line 3.
So now that we have our myfile.md saved, we can run it through Pandoc. Here’s the basic Pandoc command line recipe that I use:
pandoc myfile.md -s --toc --toc-depth=2 -o output.pdfTo explain each part:
pandoc This calls the Pandoc function — everything else is an argument that details how precisely Pandoc will operate with this command.
myfile.md This specifies the input file, that will be used as the source for converting into PDF, HTML, whatever.
-s This options tells Pandoc that we want a standalone document. Mainly this is used to generate a title page — I think it does a few other things as well, but the title page is the most important one to me.
--toc This option tells Pandoc to create a table of contents. The table of contents will appear at the start of the PDF or HTML document, and will be hyperlinked. Note the two dashes at the start; not one.
--toc-depth=2 This specifies to what depth the table of contents will reference. In this case, 2 means that the table of contents will reference down to 2nd level headers. You can change this to whatever you’d like. I think it defaults to only 1st level headers if the --toc-depth option is omitted entirely. Again, two dashes.
-o output.pdf This tells Pandoc what our output file will be. In this case, a PDF file. Pandoc will automatically detect the file extension and generate the correct file. If we had instead said -o output.html, we would have gotten an HTML file.
After typing that out and hitting ENTER, after a moment the command should complete and your new file should appear in the same directory as your input file!
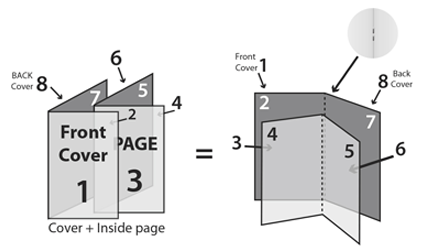
My preferred format for home-printed zines is a half-letter booklet (5.5” x 8”) since the materials are readily available in the US from any department store. If the number of pages is divisible by 4, we can print off pages in booklet format, fold them, and staple-bind them. This requires a particular arrangement of pages as shown below.
Some printers have functions in their advanced settings that will do this for you. If you don’t have that, there’s a way to do it with LaTeX commands in the console.
First, let’s get our Markdown source file set up for booklet printing. Edit your YAML metadata block and the first few lines after it so that it looks like this:
---
title: This is My Title
author: John Smith
date: 2022-01-01
papersize: letter
documentclass: extbook
fontsize: 14pt
header-includes: |
    \usepackage[margin=0.5in]{geometry}
---

\clearpage

\markboth{}{}
There are a few new additions here.
papersize: letter This does what it says on the tin, sets the PDF paper size to letter (8.5” x 11”).
documentclass: extbook The documentclass option offers a few preset layout options for PDF outputs. The book option does a few things:
The extbook option is the same as book, but also allows larger font sizes. This is useful since we will be scaling these pages down to fit two-to-a-page later on.
fontsize: 14pt This sets the font to… 14pt size. Again, since we will be scaling things down later on we need to start with a larger font size.
header-includes: |
    \usepackage[margin=0.5in]{geometry}
The header-includes: | tells Pandoc that we want the LaTeX header of this document to include some additional LaTeX commands. \usepackage[margin=0.5in]{geometry} is a LaTeX command that sets margins to 1/2” on all sides. Again, this is so that everything looks nice when scaled down two-to-a-page and printed. Remember, Pandoc uses LaTeX under the hood to handle PDF conversions.
\clearpage

\markboth{}{}
This requires a little explaining… This is a somewhat cludgy fix for an annoying issue that I found with the book and extbook document classes. If you omit these LaTeX commands, the PDF will have a header on every left hand page that says “CONTENTS” in all caps. I think this is due to the part / chapter logic picking up on the table of contents header and thinking it needs to add that to every subsequent page. Or something.
What this fix is doing is adding two LaTeX commands to the very start of the document. Since LaTeX inserts the table of contents at the very start of the document, these commands will appear immediately after the table of contents.
\clearpage This clears the current page, and cleans up floating objects like tables and pictures.
\markboth{}{} This deletes the chapter titles from the top of both the left and right pages. I think this clears whatever gets stuck in the left hand page header that results in “CONTENTS” appearing on every other page.
So again, after we update our Markdown file myfile.md, it should look like this:
---
title: This is My Title
author: John Smith
date: 2022-01-01
papersize: letter
documentclass: extbook
fontsize: 14pt
header-includes: |
    \usepackage[margin=0.5in]{geometry}
---

\clearpage

\markboth{}{}

# Introduction

This is my introduction. Blah blah blah.
Run the same Pandoc command as before to generate a PDF:
pandoc myfile.md -s --toc --toc-depth=2 -o output.pdfNow that we have a PDF, we need to write a short LaTeX script to organize the pages in the correct order for booklet printing. To do that, use your text editor to make a new file called booklet.tex with the following contents:
\documentclass{scrartcl}
\usepackage{pdfpages}
\begin{document}
\includepdf[pages=-,booklet,turn=false,landscape]{output.pdf}
\end{document}
This function uses the powerful pdfpages package to automatically organize all the pages in output.pdf in the right order, two-to-a-page, for booklet printing. Run it in the terminal with this command:
pdflatex booklet.texThis will create an output file called booklet.pdf that should be laid out perfectly for printing!
You may have to add blank pages to get the page count of your output.pdf file up to a multiple of 4.
Now all that’s left is to print, fold, assemble, and staple!